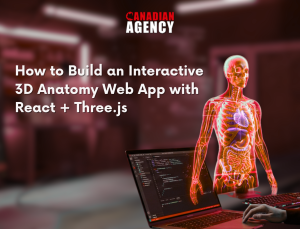

Seeing the human body in 3D on a website is no longer “future tech.” It is a clear, useful way to teach, explain, and guide people, whether they are students, patients, or health teams. Better still, users can rotate organs, zoom in, click labels, and learn at their own pace.
In this blog, we will explain how a software development agency can build an interactive 3D anatomy experience using React and Three.js. The goal is simple: help you plan and build a web app that feels smooth, loads fast, and works on real devices.
If you want inspiration for a modern medical 3D experience, you can also review this related project: Neuro Ascent.

We will focus on real build steps: assets, user actions, speed, and testing, so your team can move from idea to a working product with fewer surprises.
Interactive 3D on the web can turn a complex topic into something people can understand in minutes. Anatomy is a great example. When users can move a model with their mouse or finger, they learn faster because they can “see” structure, depth, and shape. That is hard to do with flat images.
React and Three.js are a strong pair for this kind of work. React helps you build clean screens, menus, and step-by-step learning flows. Three.js helps you render 3D models in the browser with lighting, shadows, and smooth movement. Together, they let you build a web app that feels modern without forcing users to install anything.
In this guide, we will walk through the main parts of building a 3D Anatomy Web App: choosing model files, setting up the 3D scene, adding click and hover actions, creating labels, and keeping the app fast. We will also cover common problems, like large file sizes, slow phones, and messy model parts.
By the end, you will have a clear plan to build a useful, interactive anatomy tool that loads quickly, works well, and looks professional.
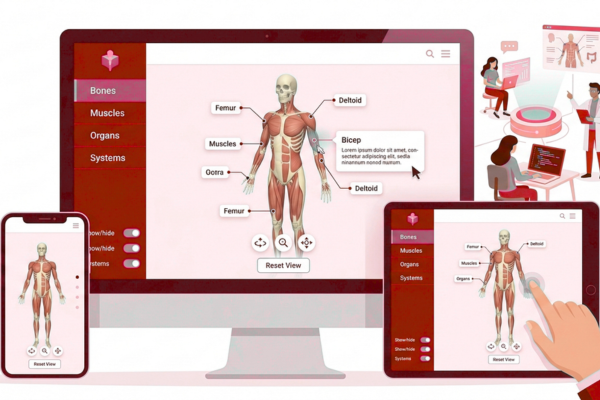
What You Are Building: Key Features Users Expect
Before you write code, decide what “interactive” means for your users. Most anatomy apps need:
- Rotate, pan, and zoom (mouse and touch)
- Tap or click to select a body part
- Labels and short descriptions
- Show/hide layers (skin, muscles, nerves, bones)
- Search (type “femur,” jump to it)
- Smooth loading and a clear loading screen
This feature list helps you avoid scope creep. It also helps you pick the right model structure early.
Step 1: Pick the Right 3D Model Format and Tools
Recommended format: glTF / GLB
For web, GLB is a common choice because it packs the model into one file, and it loads well in Three.js.
Tools you will likely use
- Blender (free) to clean models, name parts, and reduce size
- Draco compression to shrink mesh data
- KTX2 texture compression to reduce texture size
Tip: Keep separate parts as separate meshes (for example, skull, jaw, teeth). That makes selection and hide/show features easier.
Step 2: Set Up a React + Three.js Project
A common approach is to use React Three Fiber, which is a React-friendly way to use Three.js. It reduces boilerplate and fits React thinking.
Basic setup goals:
- A full-page canvas area for 3D
- A side panel for text, filters, and search
- A top bar for reset, help, and view options
Keep your UI in React, and keep your 3D rendering inside the canvas. This separation makes the app easier to grow later.
Step 3: Build the 3D Scene
Your 3D scene needs:
- Camera: usually a perspective camera
- Lights: soft, balanced lights so the model looks real but not harsh
- Controls: orbit controls for rotation and zoom
Good defaults:
- Limit zoom so users do not “fall inside” the model
- Add a Reset View button to return to the start position
- Use gentle lighting so labels stay readable
Also, set a neutral background color. In anatomy, bright or noisy backgrounds make learning harder.
Step 4: Load Models the Right Way
3D files can be large. So, loading strategy matters.
Use these practices:
- Show a loader with progress (users trust what they can see)
- Lazy load heavy parts (load the head first, then the full body)
- Split models by region (head, chest, arm) if needed
- Compress models and textures before shipping
If your app is a 3D Anatomy Web App meant for schools, remember that many users may be on slower Wi‑Fi. Fast loading is not a “nice to have.” It is the difference between use and drop-off.
Step 5: Add Hover and Click Selection
Users expect the model to respond when they point at it.
A simple interaction pattern:
- On hover: highlight the part (slight color change)
- On click: select the part, show the label, and details
- Click again: deselect, return to normal
Implementation idea:
- Use raycasting (built-in concept in Three.js) to detect what the user points to
- Store selected part ID in React state
- Update the material color or outline when selected
Keep the highlight subtle. Strong neon colors feel like a game, not a learning tool.
Step 6: Build Labels and Information Panels
A 3D model without guidance is just a 3D object. The learning value comes from the text and structure.
Common UI choices:
- Side panel: Part name, short description, key facts
- On-model labels: Simple pinned tags (use only when not cluttered)
- Breadcrumbs: System → organ → sub-part
Keep descriptions short and readable:
- 2–4 lines per part
- Add “Learn more” links if you need deeper content
This is also where you can ensure your 3D Anatomy Web App serves real users, not just demos.
Step 7: Add Layer Controls
Most anatomy experiences need layers:
- Skin
- Muscles
- Bones
- Nerves
- Blood vessels
To do this well:
- Group meshes by layer
- Use toggles (checkboxes) in the UI
- Add a “Focus mode” button that dims everything except the selected part
This helps users avoid visual overload. It also makes the app feel guided and calm.
Step 8: Keep Performance Smooth
Performance is often the biggest risk in 3D web work. Yet, you can solve most issues with planning.
Key ways to keep things fast:
- Reduce polygon count where possible
- Use compressed textures
- Avoid too many real-time shadows (bake light when you can)
- Limit post-processing effects
- Test on low to mid devices early, not at the end
Also, keep your UI light. A heavy UI plus 3D rendering can cause lag.
If your agency is building a 3D Anatomy Web App for public use, assume many users are on older phones. Design for them first, and high-end devices will still look great.
Step 9: Accessibility and Ease of Use
3D can be hard for some users. So, add friendly support:
- Keyboard controls for rotate/zoom
- Clear buttons: Reset, Help, Labels on/off
- High contrast text in panels
- Large tap targets on mobile
Also, include short tips like:
- “Drag to rotate.”
- “Scroll to zoom.”
- “Tap a part to learn more.”
These small steps reduce confusion and boost completion rates.
Step 10: Testing, Analytics, and Content Updates
Testing should cover:
- Loading time on slow internet
- Mobile touch controls (iOS and Android)
- Memory use (avoid crashes on long sessions)
- Correct part names and labels
Analytics to track:
- Most clicked parts
- Time spent per section
- Drop-off points during loading
For content updates:
- Keep descriptions in a simple JSON or CMS
- Keep part IDs stable so labels do not break
- Version your 3D models so updates are safe
Conclusion
Building an interactive 3D anatomy experience on the web is very achievable today. With React for the user interface and Three.js for the 3D view, you can deliver a clean and helpful product that works in a browser, loads without installs, and feels modern on both desktop and mobile.
The most important lesson is that great 3D is not only about visuals. It is about learning flow. Users need clear controls, clear labels, and a smooth way to move from curiosity to understanding. That is why planning matters. If you start by defining your features: rotate, select, label, show/hide layers—you can shape your 3D models and your UI around those needs. This reduces rework later.
Performance is the next key point. Anatomy models can be heavy, so you should compress files, split loading when needed, and test early on slower devices. A fast app feels “easy,” and that is what users remember. In the same way, simple wording in the side panel, calm colors, and helpful reset buttons make the tool feel welcoming, not complex.
For agencies, the best results come from teamwork between 3D artists, front-end developers, and subject experts. The 3D artist prepares clean parts and smart textures. The developer builds the scene and the interaction. The subject expert checks names, labels, and clarity. When these roles work together, the result is not just a model, it is a usable learning product.
If your next project is a 3D Anatomy Web App, treat it like a product, not a demo. Focus on user goals, keep the experience smooth, and make every click teach something valuable. That is how you build a 3D anatomy web app that people trust and return to.
FAQs
1) Can React handle 3D smoothly?
Yes, with good loading and model optimization.
2) What model format is best for the web?
GLB (glTF) is a common and efficient choice.
3) How do we keep it fast on mobile?
Use smaller models, compressed textures, and careful lighting.
4) Do we need a backend?
Not always. Only if you need user accounts, progress, or a CMS.